1、搭建前准备
- 老规矩,新建hadoop01、hadoop02、hadoop03虚拟机,并且配置好对应的免密登录(http://blog.kdyzm.cn/post/19)以及hosts
- hadoop集群搭建依赖于zookeeper集群,zookeeper集群搭建参考:http://blog.kdyzm.cn/post/127
2、下载hadoop3.3.4
官网地址:https://hadoop.apache.org/releases.html
hadoop所有历史版本下载:https://archive.apache.org/dist/hadoop/common/
当前版本下载:https://archive.apache.org/dist/hadoop/common/hadoop-3.3.4/hadoop-3.3.4.tar.gz
下载完成后,将hadoop-3.3.4.tar.gz 文件上传到hadoop01机器上的/usr/local文件夹,然后使用命令
tar -zxvf hadoop-3.3.4.tar.gz
命令解压缩当当前文件夹,之后,使用使用命令
ln -s hadoop-3.3.4 hadoop
建立软链接
3、环境变量配置
[root@hadoop01 local]# vim /etc/profile

export HADOOP_HOME=/usr/local/hadoop
export PATH=$PATH:$HADOOP_HOME/bin:$HADOOP_HOME/sbin
[root@hadoop01 logs]# vim /usr/local/hadoop/etc/hadoop/hadoop-env.sh

export JAVA_HOME=/usr/local/java
export HDFS_NAMENODE_USER=root
export HDFS_DATANODE_USER=root
export HDFS_SECONDARYNAMENODE_USER=root
export YARN_RESOURCEMANAGER_USER=root
export YARN_NODEMANAGER_USER=root
然后将配置文件复制到其它两台机器
[root@hadoop01 local]# scp /etc/profile hadoop02:/etc/profile
[root@hadoop01 local]# scp /etc/profile hadoop03:/etc/profile
退出bash,重新登陆下,或者使用命令source /etc/profile使环境变量生效
4、配置文件配置
接下来的几项配置均在/usr/local/hadoop/etc/hadoop文件夹内
4.1 core-site.xml
首先运行命令新建目录
mkdir -p /usr/local/hadoop/hadoop_data/tmp
新增配置
<configuration>
        <property>
                <name>fs.defaultFS</name>
                <value>hdfs://hadoop01:9000</value>
        </property>
        <property>
                <name>hadoop.tmp.dir</name>
                <value>/usr/local/hadoop/hadoop_data/tmp</value>
        </property>
        <property>
                <name>ha.zookeeper.quorum</name>
                <value>hadoop01:2181,hadoop02:2181,hadoop03:2181</value>
        </property>
</configuration>
4.2 hdfs-site.xml
<configuration>
    <property>
            <name>dfs.replication</name>
            <value>3</value>
    </property>
    <property>
            <name>dfs.namenode.http-address</name>
            <value>hadoop01:50070</value>
    </property>
    <property>
            <name>dfs.namenode.secondary.http-address</name>
            <value>hadoop02:50090</value>
    </property>
</configuration>
4.3 mapred-site.xml
<configuration>
    <property>
            <name>mapreduce.framework.name</name>
            <value>yarn</value>
    </property>
<property>
  <name>yarn.app.mapreduce.am.env</name>
  <value>HADOOP_MAPRED_HOME=${HADOOP_HOME}</value>
</property>
<property>
  <name>mapreduce.map.env</name>
  <value>HADOOP_MAPRED_HOME=${HADOOP_HOME}</value>
</property>
<property>
  <name>mapreduce.reduce.env</name>
  <value>HADOOP_MAPRED_HOME=${HADOOP_HOME}</value>
</property>
</configuration>
4.4 yarn-site.xml
<configuration>
   <property>
        <name>yarn.resourcemanager.hostname</name>
        <value>hadoop01</value>
   </property>

   <property>
        <description>The address of the applications manager interface in the RM.</description>
        <name>yarn.resourcemanager.address</name>
        <value>${yarn.resourcemanager.hostname}:8032</value>
   </property>

   <property>
        <description>The address of the scheduler interface.</description>
        <name>yarn.resourcemanager.scheduler.address</name>
        <value>${yarn.resourcemanager.hostname}:8030</value>
   </property>

   <property>
        <description>The http address of the RM web application.</description>
        <name>yarn.resourcemanager.webapp.address</name>
        <value>${yarn.resourcemanager.hostname}:8089</value>
   </property>

   <property>
        <description>The https adddress of the RM web application.</description>
        <name>yarn.resourcemanager.webapp.https.address</name>
        <value>${yarn.resourcemanager.hostname}:8090</value>
   </property>

   <property>
        <name>yarn.resourcemanager.resource-tracker.address</name>
        <value>${yarn.resourcemanager.hostname}:8031</value>
   </property>

   <property>
        <description>The address of the RM admin interface.</description>
        <name>yarn.resourcemanager.admin.address</name>
        <value>${yarn.resourcemanager.hostname}:8033</value>
   </property>

   <property>
        <name>yarn.nodemanager.aux-services</name>
        <value>mapreduce_shuffle</value>
   </property>

   <property>
        <name>yarn.scheduler.maximum-allocation-mb</name>
        <value>2048</value>
        <discription>每个节点可用内存,单位MB,默认8182MB</discription>
   </property>

   <property>
        <name>yarn.nodemanager.vmem-pmem-ratio</name>
        <value>2.1</value>
   </property>

   <property>
        <name>yarn.nodemanager.resource.memory-mb</name>
        <value>2048</value>
   </property>
   <property>
        <name>yarn.nodemanager.vmem-check-enabled</name>
        <value>false</value>
</property>
</configuration>
4.5 workers
hadoop01
hadoop02
hadoop03
5、将程序分发到其它节点
[root@hadoop01 local]# scp -r hadoop-3.3.4 hadoop02:/usr/local/
[root@hadoop01 local]# scp -r hadoop-3.3.4 hadoop03:/usr/local/
其它节点也需要软链接建立,分别在另外两台虚拟机上运行命令
[root@hadoop02 local]# ln -s /usr/local/hadoop-3.3.4 hadoop
[root@hadoop03 local]# ln -s /usr/local/hadoop-3.3.4 hadoop
6、hdfs集群构建
6.1 启动hdfs集群
在hadoop01机器上,运行命令
初次启动hdfs集群,需要格式化namenode
[hadoop@hadoop220 hadoop-3.1.3]$ hdfs namenode -format
之后进入/usr/local/hadoop/sbin目录,执行命令
[root@hadoop02 sbin]# ./start-dfs.sh
在hadoop01启动完成之后,hadoop02、hadoop03上的程序会一起启动起来
6.2 验证hdfs状态
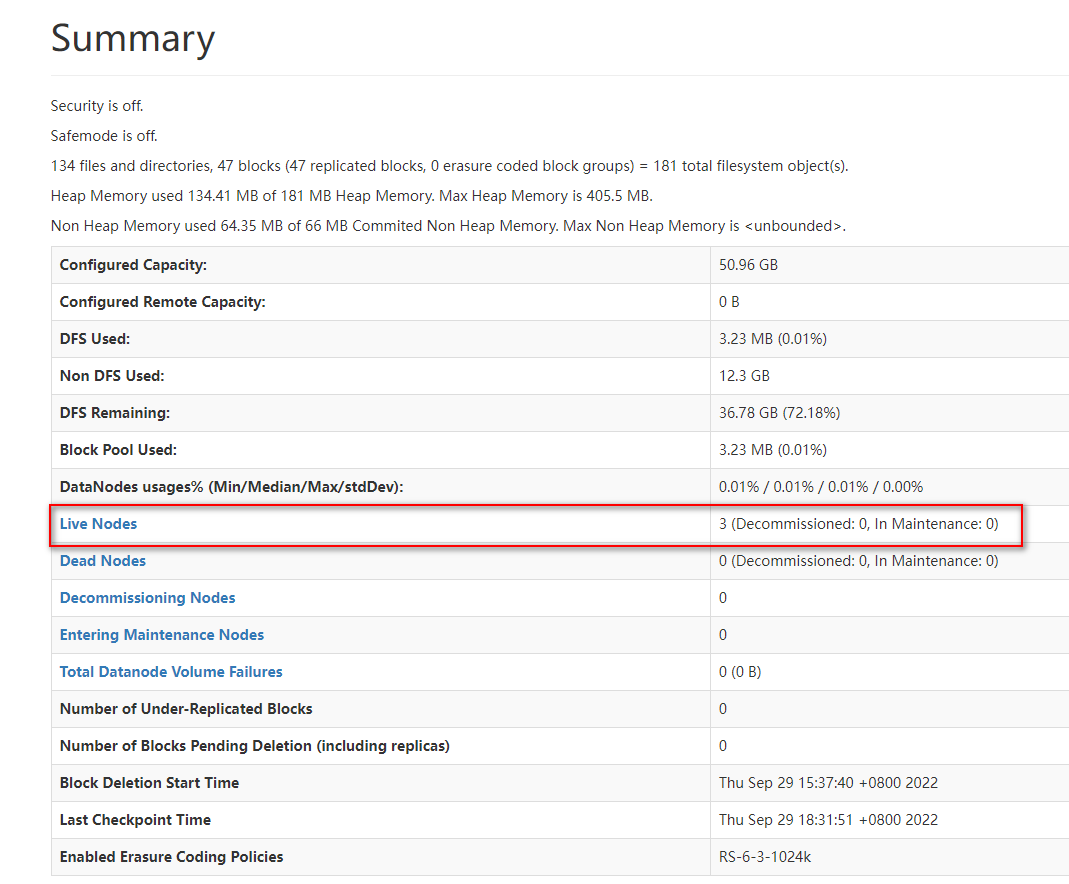
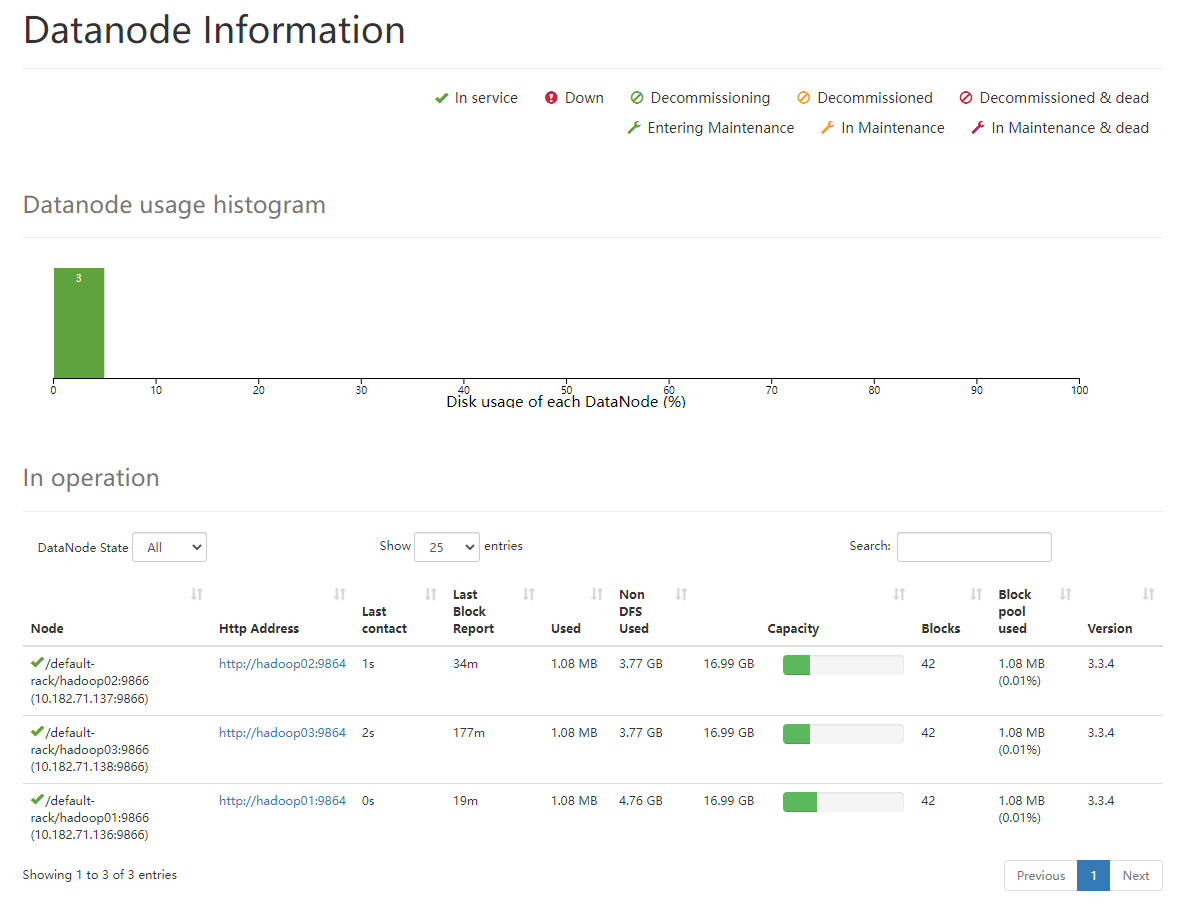
打开浏览器,输入地址(hadoop01):http://10.182.71.136:50070/dfshealth.html#tab-datanode
可以随便点点看看


可以看到一切正常;之后可以在每台机器上运行jps命令查看启动的进程
[root@hadoop01 local]# jps
1826 NameNode
6680 Jps
1532 QuorumPeerMain
1981 DataNode
[root@hadoop02 sbin]# jps
1544 QuorumPeerMain
1772 SecondaryNameNode
1693 DataNode
4399 Jps
[root@hadoop03 bin]# jps
1510 QuorumPeerMain
1654 DataNode
3055 Jps
可以看到,三台机器均作为DataNode身份运行;hadoop01还运行着主NameNode,hadoop02运行着SecondaryNameNode
6.3 测试hdfs命令
hdfs有命令行工具能连接到hadoop集群并且执行上传等基本指令。
现在目标是新建个文件并且上传到hadoop集群。
[root@hadoop01 local]# echo "hello word" > aaa.txt
[root@hadoop01 local]# hdfs dfs -mkdir /test
[root@hadoop01 local]# hdfs dfs -put aaa.txt /test
[root@hadoop01 local]# hdfs dfs -ls /test
Found 1 items
-rw-r--r--   3 root supergroup         11 2022-09-29 19:06 /test/aaa.txt
7、yarn集群构建
7.1 启动yarn集群
运行命令
[root@hadoop01 sbin]# /usr/local/hadoop/sbin/start-yarn.sh
7.2 验证yarn状态
然后使用jps命令在三个虚拟机上分别查看进程
[root@hadoop01 sbin]# jps
2433 ResourceManager
1826 NameNode
2579 NodeManager
7050 Jps
1532 QuorumPeerMain
1981 DataNode
[root@hadoop02 sbin]# jps
1544 QuorumPeerMain
1772 SecondaryNameNode
1693 DataNode
1917 NodeManager
4623 Jps
[root@hadoop03 bin]# jps
1792 NodeManager
3188 Jps
1510 QuorumPeerMain
1654 DataNode
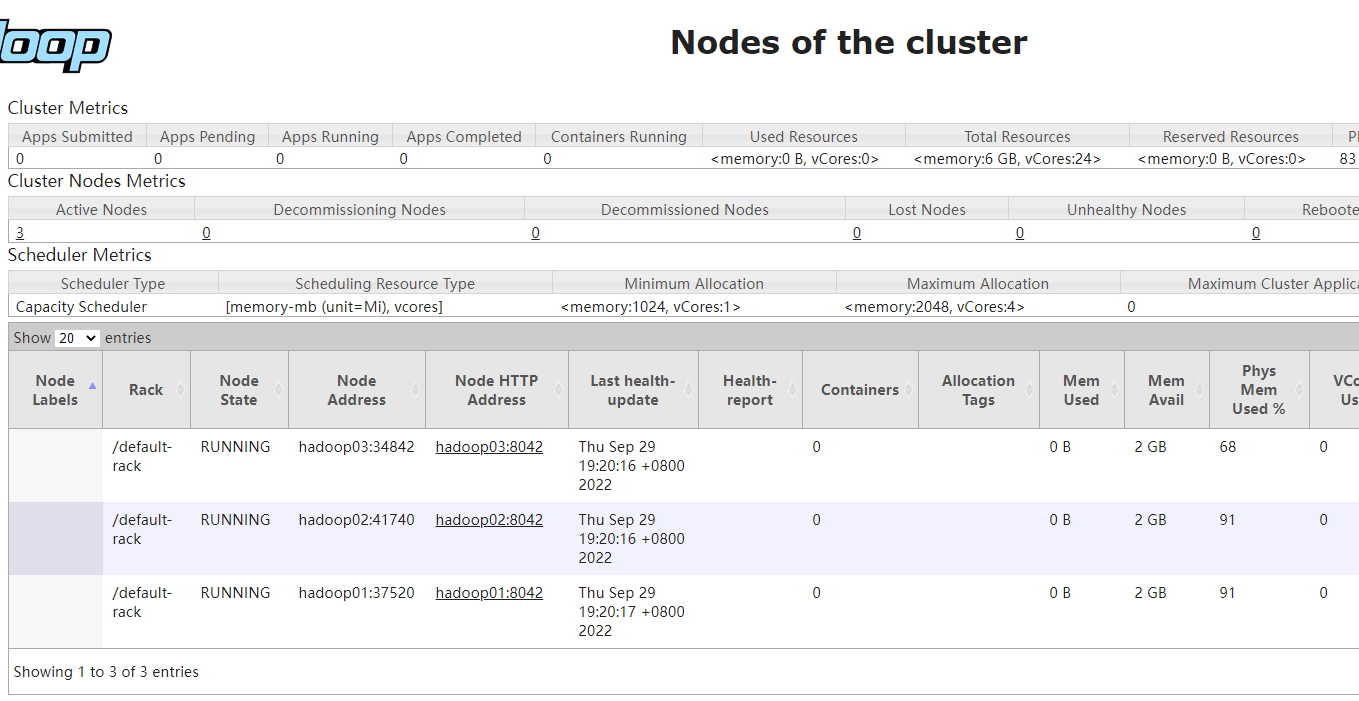
可以看到三台机器都以NodeManager身份运行着,其中hadoop01还运行着ResourceManager;
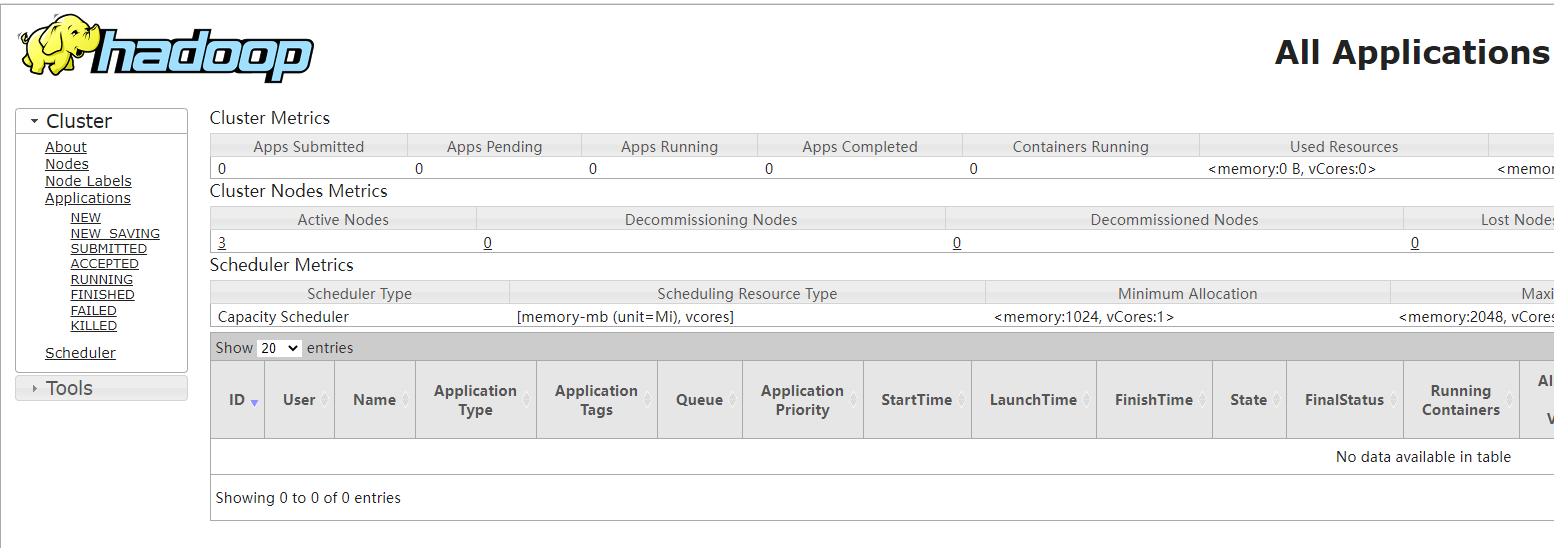
接下来看下web管理端,打开浏览器,输入地址:http://hadoop01:8089/
 可以看到有三台活着的节点,点进去看看

7.3 mapreduce测试
这里运行一个简单的mapreduce程序进行测试
首先,准备一个djt.txt文件并上传到hadoop
[root@hadoop03 bin]# vim djt.txt
hello word
hello hadoop
hello kdyzm
[root@hadoop03 bin]# hdfs dfs -put djt.txt /test
[root@hadoop03 bin]# hdfs dfs -ls /test/djt.txt
-rw-r--r--   3 root supergroup         54 2022-09-28 18:37 /test/djt.txt
之后,运行命令
[root@hadoop01 hadoop]# hadoop jar share/hadoop/mapreduce/hadoop-mapreduce-examples-3.3.4.jar wordcount /test/djt.txt /test/out.txt
2022-09-29 19:32:14,975 INFO client.DefaultNoHARMFailoverProxyProvider: Connecting to ResourceManager at hadoop01/10.182.71.136:8032
2022-09-29 19:32:15,686 INFO mapreduce.JobResourceUploader: Disabling Erasure Coding for path: /tmp/hadoop-yarn/staging/root/.staging/job_1664437097540_0001
2022-09-29 19:32:16,026 INFO input.FileInputFormat: Total input files to process : 1
2022-09-29 19:32:16,125 INFO mapreduce.JobSubmitter: number of splits:1
2022-09-29 19:32:16,322 INFO mapreduce.JobSubmitter: Submitting tokens for job: job_1664437097540_0001
2022-09-29 19:32:16,322 INFO mapreduce.JobSubmitter: Executing with tokens: []
2022-09-29 19:32:16,654 INFO conf.Configuration: resource-types.xml not found
2022-09-29 19:32:16,654 INFO resource.ResourceUtils: Unable to find 'resource-types.xml'.
2022-09-29 19:32:17,555 INFO impl.YarnClientImpl: Submitted application application_1664437097540_0001
2022-09-29 19:32:17,611 INFO mapreduce.Job: The url to track the job: http://hadoop01:8089/proxy/application_1664437097540_0001/
2022-09-29 19:32:17,611 INFO mapreduce.Job: Running job: job_1664437097540_0001
2022-09-29 19:32:27,774 INFO mapreduce.Job: Job job_1664437097540_0001 running in uber mode : false
2022-09-29 19:32:27,776 INFO mapreduce.Job:  map 0% reduce 0%
2022-09-29 19:32:35,892 INFO mapreduce.Job:  map 100% reduce 0%
2022-09-29 19:32:42,938 INFO mapreduce.Job:  map 100% reduce 100%
2022-09-29 19:32:42,950 INFO mapreduce.Job: Job job_1664437097540_0001 completed successfully
2022-09-29 19:32:43,054 INFO mapreduce.Job: Counters: 54
        File System Counters
                FILE: Number of bytes read=36
                FILE: Number of bytes written=552425
                FILE: Number of read operations=0
                FILE: Number of large read operations=0
                FILE: Number of write operations=0
                HDFS: Number of bytes read=152
                HDFS: Number of bytes written=22
                HDFS: Number of read operations=8
                HDFS: Number of large read operations=0
                HDFS: Number of write operations=2
                HDFS: Number of bytes read erasure-coded=0
        Job Counters
                Launched map tasks=1
                Launched reduce tasks=1
                Data-local map tasks=1
                Total time spent by all maps in occupied slots (ms)=5198
                Total time spent by all reduces in occupied slots (ms)=3418
                Total time spent by all map tasks (ms)=5198
                Total time spent by all reduce tasks (ms)=3418
                Total vcore-milliseconds taken by all map tasks=5198
                Total vcore-milliseconds taken by all reduce tasks=3418
                Total megabyte-milliseconds taken by all map tasks=5322752
                Total megabyte-milliseconds taken by all reduce tasks=3500032
        Map-Reduce Framework
                Map input records=3
                Map output records=6
                Map output bytes=78
                Map output materialized bytes=36
                Input split bytes=98
                Combine input records=6
                Combine output records=2
                Reduce input groups=2
                Reduce shuffle bytes=36
                Reduce input records=2
                Reduce output records=2
                Spilled Records=4
                Shuffled Maps =1
                Failed Shuffles=0
                Merged Map outputs=1
                GC time elapsed (ms)=233
                CPU time spent (ms)=1410
                Physical memory (bytes) snapshot=484057088
                Virtual memory (bytes) snapshot=5589962752
                Total committed heap usage (bytes)=374865920
                Peak Map Physical memory (bytes)=268537856
                Peak Map Virtual memory (bytes)=2790043648
                Peak Reduce Physical memory (bytes)=215519232
                Peak Reduce Virtual memory (bytes)=2799919104
        Shuffle Errors
                BAD_ID=0
                CONNECTION=0
                IO_ERROR=0
                WRONG_LENGTH=0
                WRONG_MAP=0
                WRONG_REDUCE=0
        File Input Format Counters
                Bytes Read=54
        File Output Format Counters
                Bytes Written=22
然后打开浏览器查看yarn集群:http://hadoop01:8089/cluster

可以看到yarn集群的web页面上也能够查询出来了。
8、遇到的问题
- hdfs集群里节点不全:删除hadoop数据后,重新格式化:hdfs namenode -format
- yarn集群启动失败,ResourceManager进程一直启动不起来,报端口号绑定异常:修改yarn配置文件,换一个节点试试
service脚本
vim /etc/init.d/hdfs

#!/bin/bash
#chkconfig:2345 20 90
#description:hdfs
#processname:hdfs
export JAVA_HOME=//usr/java/jdk
case $1 in
        start) su root /usr/local/hadoop/sbin/start-dfs.sh;;
        stop) su root /usr/local/hadoop/sbin/stop-dfs.sh;;
        *) echo "require start|stop" ;;
esac
vim /etc/init.d/yarn

#!/bin/bash
#chkconfig:2345 20 90
#description:yarn
#processname:yarn
export JAVA_HOME=//usr/java/jdk
case $1 in
        start) su root /usr/local/hadoop/sbin/start-yarn.sh;;
        stop) su root /usr/local/hadoop/sbin/stop-yarn.sh;;
        *) echo "require start|stop" ;;
esac
注意:本文归作者所有,未经作者允许,不得转载