上一篇文章《Redis(十二):Java客户端之Spring Data Redis》最后讲了使用Redis作为缓存集成到SpringBoot,虽然Redis比较高效,但是相对于本地缓存来说效率还是比较低。本篇文章将基于Java21+Springboot3.5.4,使用Caffeine作为一级缓存,Redis作为二级缓存实现高性能二级缓存功能,并封装成SpringBoot Starter上传到Maven中央仓库。
一、SpringBoot Caching
SpringBoot中有个spring-boot-starter-cache组件,该组件是 Spring Boot 提供的用于简化缓存管理的 Starter 依赖,其核心作用是为 Spring 应用提供声明式缓存支持,通过抽象层统一不同缓存技术的使用方式,从而提升应用性能并降低开发复杂度。
spring-boot-starter-cache本身不实现具体缓存技术,而是通过 Spring Cache 抽象层(如 CacheManager和 Cache接口)支持多种缓存后端(如 Redis、Caffeine、EhCache 等)。开发者只需通过注解配置即可切换缓存实现,无需修改业务代码。通过 @EnableCaching注解启用缓存后,只需更换依赖(如从 ConcurrentMap切换到 Redis),Spring Boot 会自动配置对应的 CacheManager。
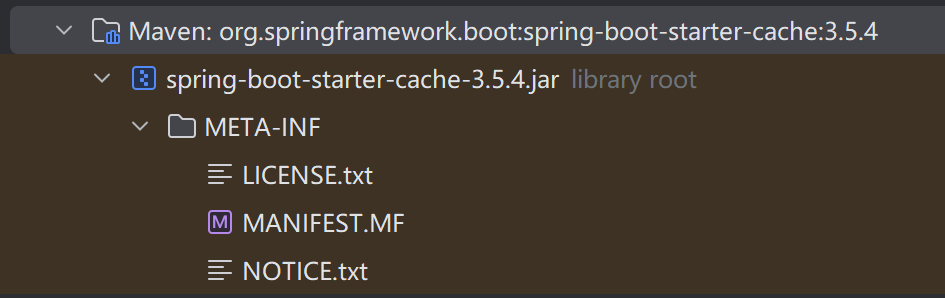
从上图可以看到,spring-boot-starter-cache组件没有任何代码,它只是通过pom文件将相关的依赖引入进来:
<dependencies>
    <dependency>
      <groupId>org.springframework.boot</groupId>
      <artifactId>spring-boot-starter</artifactId>
      <version>3.5.4</version>
      <scope>compile</scope>
    </dependency>
    <dependency>
      <groupId>org.springframework</groupId>
      <artifactId>spring-context-support</artifactId>
      <version>6.2.9</version>
      <scope>compile</scope>
    </dependency>
</dependencies>
最重要的依赖就是spring-context-support,它是spring-context的扩展组件。
在使用的时候,
用户需显式引入所需的缓存库(如 caffeine或 spring-boot-starter-data-redis),Spring Boot 会根据依赖自动配置对应的 CacheManager。例如:
- 引入
caffeine后,Spring Boot 会生成CaffeineCacheManager。 - 引入 Redis 后,会生成
RedisCacheManager
1、CacheManager
CacheManager类是Spring抽象出来的缓存管理器接口,从名字上就知道它是干什么的了:缓存管理器,似乎是专门管理缓存的,那我们猜测它应该有CRUD方法,实际它长什么样子呢?
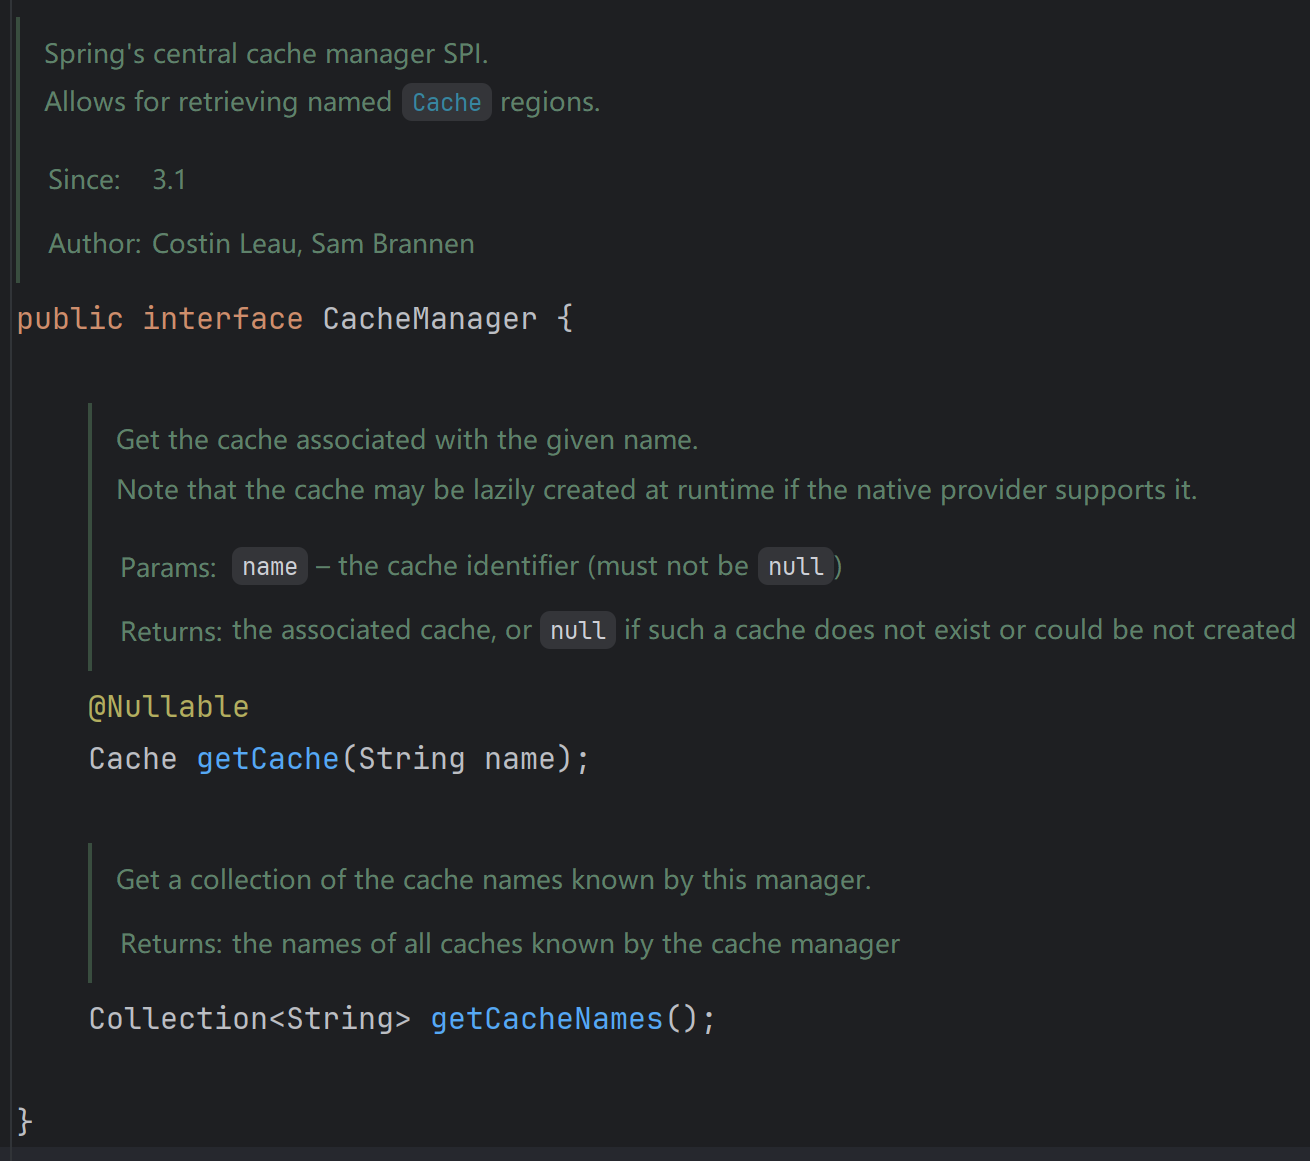
可以看到该接口特别简单,它只提供了getCache和getCacheNames方法,和我们预想的它应该有CRUD方法有很大不同,为什么会这样子呢?
因为**动态缓存管理是特定于底层技术的,无法被完美抽象,Spring CacheManager 的核心职责不是一个缓存实例的管理器,而是一个缓存抽象的门面或访问点。**因此它没有将对缓存的具体操作抽象出来,具体的操作都封装到了Cache接口中,由不同的服务提供商实现。
RedisCacheManager不是必须的,以Redis为例,在我们使用spring-boot-starter-data-redis的时候,如果只是使用了RedisTemplate直接操作Redis,则RedisCacheManager就算不存在也没关系,因为这两者是服务于不同目的、不同抽象层次的工具,理论上可以完全独立使用。
| 特性 | RedisTemplate | RedisCacheManager |
|---|---|---|
| 抽象层级 | 命令式、底层操作 | 声明式、高层抽象 |
| 核心目的 | 提供一套丰富的、类型化的 API 来直接执行 Redis 命令(如 opsForValue(), opsForHash())。 |
作为 Spring 缓存抽象 的实现,将 @Cacheable 等注解的行为映射到 Redis。 |
| 使用方式 | 在代码中显式调用其方法,如 redisTemplate.opsForValue().set("key", "value")。 |
由 Spring 框架在背后自动调用,开发者通过注解来使用。 |
| 数据序列化 | 高度可控。可以为不同的操作(value, hash key, hash value等)单独配置序列化器。 | 通常为缓存值(Cache)统一配置序列化器,Key 的生成也遵循特定规则。 |
| 是否必需 | 是 直接操作 Redis 的必需组件。 | 否 仅在使用 Spring 的声明式缓存注解(@Cacheable等)时才需要。 |
如果我们想设计Caffeine+Reids二级缓存实现,并且使用Redis注解实现缓存功能,则自己实现CacheManager即可。那问题来了,是不是RedisCacheManager也会自动创建,如果自动创建了,那会使用哪个CacheManager呢?实际上应用程序只允许一个CacheManager存在,看看RedisCacheManager的配置(org.springframework.boot.autoconfigure.cache.RedisCacheConfiguration):

这里面有个很重要的注解:@ConditionalOnMissingBean(CacheManager.class),意思就是如果我们自定义了CacheManager,就不会创建默认的RedisCacheManager了。这样我们自定义CacheManager就可以取而代之了。
2、Cache
Cache接口和CacheManager接口搭配使用,CacheManager对外提供统一的访问入口,对缓存的CRUD底层操作则依赖于Cache接口。可以这么认为:CacheManager 是一个工具箱,而 Cache 是工具箱里的一把把具体的工具(比如螺丝刀、锤子、扳手)。
| 特性 | CacheManager (工具箱) | Cache (工具) |
|---|---|---|
| 角色 | 容器、工厂、管理器 | 内容、产品、被管理对象 |
| 核心职责 | 1. 管理所有 Cache 实例的生命周期。 2. 根据名称提供(获取或创建)Cache 对象。 3. 对外提供统一的访问入口。 |
1. 定义缓存的基本操作接口(CRUD)。 2. 实际存储和访问缓存数据(键值对)。 |
| 关注点 | “有哪些缓存?” “给我名叫‘A’的缓存” | “缓存里有什么?” “根据Key‘123’获取值” |
| 方法 | Cache getCache(String name) Collection<String> getCacheNames() |
ValueWrapper get(Object key) void put(Object key, Object value) void evict(Object key) void clear() |
| 类比 | JDBC 中的 DataSource |
JDBC 中的 Connection |
由于我们要设计并实现Caffeine+Redis二级缓存架构,所以可以预想到的是必须自定义Cache并在里面实现二级缓存的CRUD功能。
3、@EnableCaching
@EnableCaching 和 spring-boot-starter-data-redis 提供的自动配置(Auto-Configuration)是两个完全独立的功能。@EnableCaching 只负责激活 Spring 的声明式缓存抽象层(即让 @Cacheable, @CacheEvict 等注解生效),spring-boot-starter-data-redis 负责自动配置所有与 Redis 连接和操作相关的基础设施 Bean,其中最核心的就是 RedisConnectionFactory。
这样,我们实现了自定义的CacheManager以及Cache,通过@EnableCaching注解就可以通过Spring原生注解方式使用我们的二级缓存了。
二、Caffeine
caffeine是最流行的本地缓存组件,被称为“本地缓存之王”。
github地址:https://github.com/ben-manes/caffeine
关于它的使用,可以参考其wiki:https://github.com/ben-manes/caffeine/wiki/Home-zh-CN
1、Caffeine的CRUD操作
首先加入Caffeine的依赖:
<dependency>
    <groupId>com.github.ben-manes.caffeine</groupId>
    <artifactId>caffeine</artifactId>
    <version>3.2.2</version>
</dependency>
首先创建一个缓存实例:
private static Cache<String, Object> cache = Caffeine.newBuilder()
        .expireAfterWrite(10, TimeUnit.MINUTES) // 写入后10分钟过期
        .maximumSize(1000) // 最大缓存数量
        .build();
然后测试其CRUD功能
@Data
@AllArgsConstructor
public static class User {
    private String name;
}

@Test
public void testCRUD() {
    User user1 = new User("张三");
    User user2 = new User("李四");
    //添加到缓存
    cache.put(user1.getName(), user1);
    cache.put(user2.getName(), user2);
    //查询缓存中的信息
    System.out.println(cache.getIfPresent(user1.getName()));
    System.out.println(cache.getIfPresent(user2.getName()));
    //删除缓存中的信息
    cache.invalidate(user1.name);
    System.out.println(cache.getIfPresent(user1.getName()));
}
可以看到,其实Caffeine的使用非常简单,更多高级功能使用,可以参考wiki。
2、整合Caffeine到SpringBoot
在之前的一篇文章中讲了redis spring-boot-starter的使用,redis spring-boot-starter属于Spring Data家族的,关于Spring Data可以看看文档:https://spring.io/projects/spring-data
可以看到Spring Data支持Redis、ES、Mongo等组件,但是并不支持Caffeine,但是这并不意味着Caffeine无法集成到SpringBoot使用Spring Cache原生注解。之前已经分析过,要想SpringBoot支持使用Spring Cache的原生注解,需要创建CacheManager,实际上Spring已经帮我们做好了支持CacheManager的准备:
在spring-context-support模块,已经定义好了CaffeineCacheManager:org.springframework.cache.caffeine.CaffeineCacheManager
在spring-boot-autoconfigure模块,已经定义好了CaffeineCacheConfiguration:org.springframework.boot.autoconfigure.cache.CaffeineCacheConfiguration

可以看到,只要引入了Caffeine的依赖以及spring-context-support的依赖,CaffeineCacheManager就会自动被创建。
需要注意的是,如果同时引入了Spring Data Redis和Caffeine,则Redis会优先生效,为了避免意外的缓存行为,推荐在实践过程中“明确配置”而非依赖默认行为。
基础使用
第一步:引入maven依赖配置:
<dependencyManagement>
        <dependencies>
            <dependency>
                <groupId>org.springframework.boot</groupId>
                <artifactId>spring-boot-dependencies</artifactId>
                <version>3.5.4</version>
                <type>pom</type>
                <scope>import</scope>
            </dependency>
        </dependencies>
    </dependencyManagement>
    <dependencies>
        <dependency>
            <groupId>org.springframework.boot</groupId>
            <artifactId>spring-boot-starter-cache</artifactId>
        </dependency>
        <dependency>
            <groupId>com.github.ben-manes.caffeine</groupId>
            <artifactId>caffeine</artifactId>
        </dependency>
</dependencies>
spring-context-support会在引入spring-boot-starter-cache的同时被引入,所以不需要单独引入了。
第二步:使用Cache
package cn.kdyzm.component.cache.service;

import lombok.AllArgsConstructor;
import lombok.Data;
import org.springframework.cache.annotation.CacheEvict;
import org.springframework.cache.annotation.Cacheable;
import org.springframework.stereotype.Service;

/**
 * @author kdyzm
 * @date 2025/9/24
 */
@Service
public class UserService {

    private static final String CACHE_NAME = "users";

    @Data
    @AllArgsConstructor
    public static class User {
        private Long id;
        private String name;
    }

    @Cacheable(value = CACHE_NAME, key = "#id", unless = "#result == null")
    public User getUserById(Long id) {
        System.out.println("从数据库查询用户: " + id);
        return new User(id, "用户");
    }

    /**
     * 更新操作 - 清除缓存
     */
    @CacheEvict(value = CACHE_NAME, key = "#user.id")
    public User updateUser(User user) {
        System.out.println("更新用户并清除缓存: " + user.getId());
        return user;
    }

    /**
     * 删除操作 - 清除缓存
     */
    @CacheEvict(value = CACHE_NAME, key = "#id")
    public void deleteUser(Long id) {
        System.out.println("删除用户并清除缓存: " + id);
    }

}
第三步:测试
package cn.kdyzm;

import cn.kdyzm.component.cache.Application;
import cn.kdyzm.component.cache.service.UserService;
import lombok.extern.slf4j.Slf4j;
import org.junit.jupiter.api.Test;
import org.springframework.beans.factory.annotation.Autowired;
import org.springframework.boot.test.context.SpringBootTest;

import static org.junit.jupiter.api.Assertions.assertNotNull;

/**
 * @author kdyzm
 * @date 2025/9/24
 */
@SpringBootTest(classes = {Application.class})
@Slf4j
public class CaffeineSpringBootTest {

    @Autowired
    private UserService userService;

    @Test
    public void testCache() {
        // 第一次查询 - 会访问数据库
        UserService.User user1 = userService.getUserById(1L);
        assertNotNull(user1);

        // 第二次查询 - 从缓存获取
        UserService.User user2 = userService.getUserById(1L);
        assertNotNull(user2);

        // 删除用户 - 会清除缓存
        userService.deleteUser(1L);

        // 再次查询 - 会访问数据库(因为缓存被清除了)
        UserService.User user3 = userService.getUserById(1L);
        assertNotNull(user3);
    }
}
配置参数
上述案例中并没有单独的配置文件配置,实际上可以对缓存行为进行配置:
spring:
  cache:
    caffeine:
      spec: maximumSize=500,expireAfterAccess=600s
    type: caffeine
这样配置很不方便,没有配置提示什么的,完整的配置有哪些参数可以参考类:com.github.benmanes.caffeine.cache.CaffeineSpec。
完整的配置参数如下所示:
| 配置键 (Key) | 数据类型 | 说明 | 默认值 | 语法示例 |
|---|---|---|---|---|
| initialCapacity | int |
设置缓存的初始容量(空间大小)。 | UNSET_INT (-1) |
initialCapacity=100 |
| maximumSize | long |
设置缓存的最大条数(基于条目数量驱逐)。 注意:与 maximumWeight 互斥。 |
UNSET_INT (-1) |
maximumSize=1000 |
| maximumWeight | long |
设置缓存的最大权重(基于权重驱逐,需配合 weigher 使用)。 注意:与 maximumSize 互斥。 |
UNSET_INT (-1) |
maximumWeight=200000 |
| expireAfterAccess | Duration |
设置最后一次访问(读取或写入)后的过期时间。 | null |
expireAfterAccess=10m |
| expireAfterWrite | Duration |
设置最后一次写入后的过期时间。 | null |
expireAfterWrite=1h |
| refreshAfterWrite | Duration |
设置写入后多久自动刷新缓存值(需配置 CacheLoader)。 |
null |
refreshAfterWrite=30s |
| weakKeys | boolean (无值) |
将键(Key)设置为弱引用,允许JVM在内存不足时回收键。 | false / null |
weakKeys |
| weakValues | boolean (无值) |
将值(Value)设置为弱引用,允许JVM在内存不足时回收值。 注意:与 softValues 互斥。 |
false / null |
weakValues |
| softValues | boolean (无值) |
将值(Value)设置为软引用,在JVM内存不足时优先回收。 注意:与 weakValues 互斥。 |
false / null |
softValues |
| recordStats | boolean (无值) |
开启缓存统计功能(如命中率),可通过 Cache.stats() 获取。 |
false |
recordStats |
自定义CaffeineCacheManager
官方默认创建CaffeineCacheManager的代码位于org.springframework.boot.autoconfigure.cache.CaffeineCacheConfiguration,如果觉得spring官方提供的配置Caffeine的方式不方便,可以自定义创建方式,从而取代官方的创建方式。
    @Bean
    CaffeineCacheManager cacheManager() {
        CaffeineCacheManager cacheManager = new CaffeineCacheManager();
        cacheManager.setCaffeine(Caffeine.newBuilder()
                .maximumSize(100)
                .expireAfterWrite(10, TimeUnit.SECONDS)
                .recordStats()
                .xxxx
        );
        return cacheManager;
    }
这样就可以自定义配置文件的格式灵活配置CacheManager了。
创建独立使用的Caffeine Cache
上述创建CaffeineCacheManager的方法适用于SpringCache缓存注解使用,如果想直接操作Caffeine,则需要创建一个新的客户端。值得注意的是Caffeine的所有操作都是线程安全的,所以只需要全局创建一个单例实例即可:
    @Bean
    public Cache<String,Object> caffeineCache(){
        return Caffeine.newBuilder()
                .initialCapacity(xxx)//初始大小
                .maximumSize(xxx)//最大数量
                .expireAfterWrite(xxx)//过期时间
            	.xxx
                .build();
    }
三、二级缓存架构实现
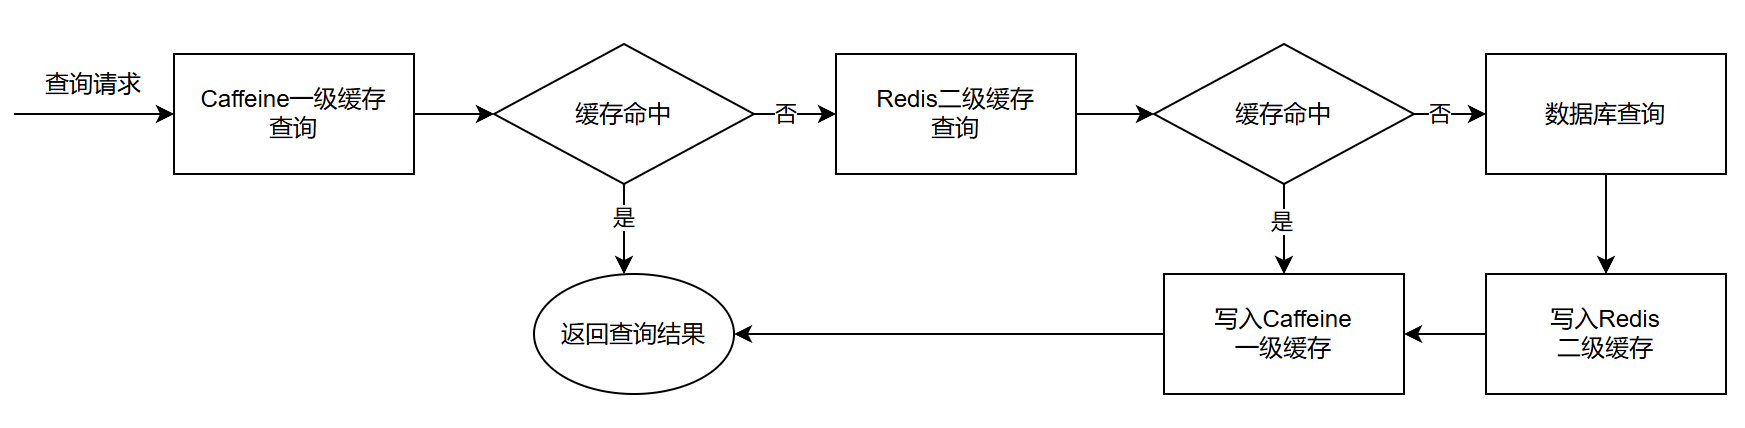
接下来使用Caffeine作为一级缓存,Redis作为二级缓存实现多级缓存功能,其查询架构如下所示:
我的目标是实现一个基于Java21+Springboot3.5.4的SpringBoot Starter组件,名字为cache-spring-boot-starter,最终实现实现功能:可独立开启Caffeine、Redis或者二级缓存三种功能模式,三种模式下均支持SpringCache基于注解的缓存架构,暴露统一独立操控缓存API。
我将相关功能封装成了一个组件,并发布到了gitee:https://gitee.com/kdyzm/cache-spring-boot-starter ,该组件已经上传到了中央仓库( https://central.sonatype.com/artifact/cn.kdyzm/cache-spring-boot-starter ),GAV坐标如下:
<dependency>
    <groupId>cn.kdyzm</groupId>
    <artifactId>cache-spring-boot-starter</artifactId>
    <version>1.0.0</version>
</dependency>
由于组件使用java21+Springboot3.5.4,所以在测试的时候需要搭建相应环境的项目,这里已经搭建好了测试环境,可以直接拉下来测试:https://gitee.com/kdyzm/cache-spring-boot-demo
1、配置文件
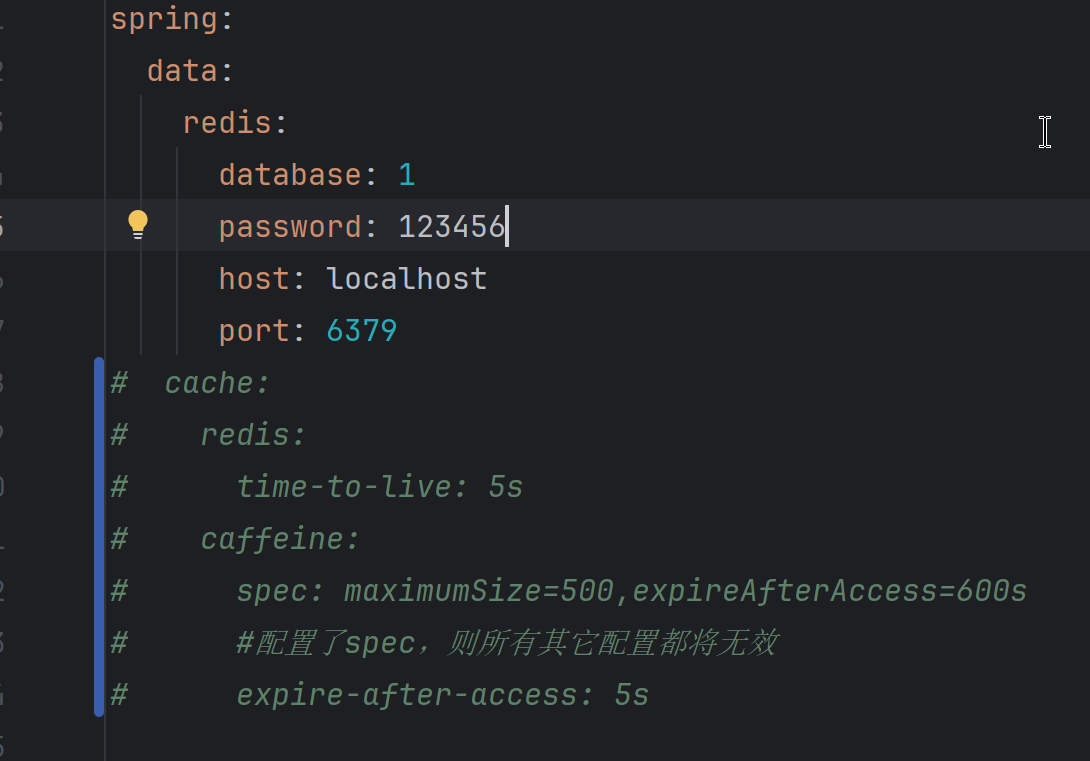
在pom.xml中引入cache-spring-boot-starter的依赖后,配置下配置文件如下:
spring:
  data:
    redis:
      database: 1
      password: 123456
      host: localhost
      port: 6379
  cache:
    redis:
      time-to-live: 5s
    caffeine:
      spec: maximumSize=500,expireAfterAccess=600s
      #配置了spec,则所有其它配置都将无效
      expire-after-access: 5s
      #caffeine其它配置

logging:
  level:
    cn.kdyzm.component.cache: DEBUG
#    org.springframework.cache: TRACE
#    org.springframework.data.redis: DEBUG
其配置和原生spring-boot-starter-cache和spring-boot-starter-data-redis是一模一样的,特别需要注意的是spring.cache.caffeine的spec配置,它原生的配置是一段字符串,格式是这样的:maximumSize=500,expireAfterAccess=600s,...,为了方便使用,我将其抽离出来形成一个个单独的配置,格式如下:
spring:
  cache:
    caffeine:
      expire-after-access: 5s
      maximum-size: 500
      ......
这样配置就和spec配置冲突了,所以代码里有约定:如果spec有值,则完全使用spec的配置;否则将使用其它独立的配置。
2、激活缓存配置
这里提供了三种不同的注解,用于激活不同的功能项:
@EnableCaffeineCache:仅使用Caffeine本地缓存。
@EnableRedisCache:仅使用Redis缓存
@EnableMultipleCache:使用Caffeine+Redis二级缓存。
将注解加在启动类上即可:
@SpringBootApplication
//@EnableMultipleCache
//@EnableCaffeineCache
//@EnableRedisCache
public class Application {

    public static void main(String[] args) {
        SpringApplication.run(Application.class, args);
    }
}
项目启动后会打印当前使用的CacheManager:
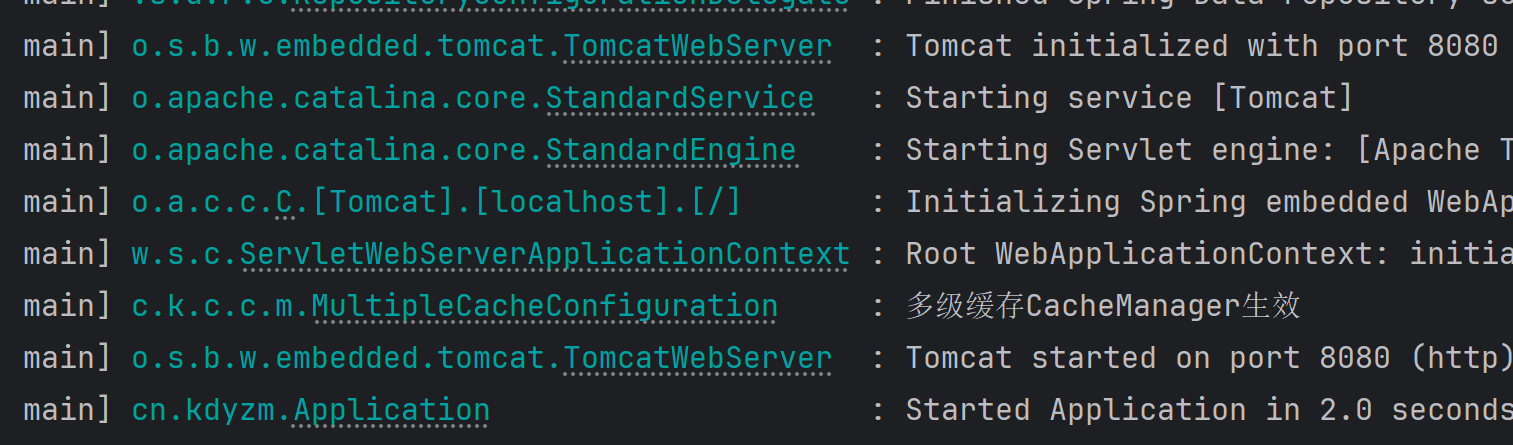
需要注意的是,如果不使用以上三种自定义注解,使用@EnableCaching注解,则会退回使用原生spring-cache相关功能。
3、业务代码中使用
配置完成之后,就可以在代码中使用了,使用方式和spring-cache注解方式是一模一样的,案例如下:
import lombok.AllArgsConstructor;
import lombok.Data;
import lombok.NoArgsConstructor;
import org.springframework.cache.annotation.CacheEvict;
import org.springframework.cache.annotation.Cacheable;
import org.springframework.stereotype.Service;

/**
 * @author kdyzm
 * @date 2025/9/24
 */
@Service
public class UserService {

    private static final String CACHE_NAME = "users";

    @Data
    @AllArgsConstructor
    @NoArgsConstructor
    public static class User {
        private Long id;
        private String name;
    }

    @Cacheable(value = CACHE_NAME, key = "#id", unless = "#result == null")
    public User getUserById(Long id) {
        System.out.println("从数据库查询用户: " + id);
        return new User(id, "用户");
    }

    /**
     * 更新操作 - 清除缓存
     */
    @CacheEvict(value = CACHE_NAME, key = "#user.id")
    public User updateUser(User user) {
        System.out.println("更新用户并清除缓存: " + user.getId());
        return user;
    }

    /**
     * 删除操作 - 清除缓存
     */
    @CacheEvict(value = CACHE_NAME, key = "#id")
    public void deleteUser(Long id) {
        System.out.println("删除用户并清除缓存: " + id);
    }

}
4、测试二级缓存功能
拉取代码仓库代码:https://gitee.com/kdyzm/cache-spring-boot-demo,使用@EnableMultipleCache注解激活二级缓存功能,配置好配置文件中redis的链接,之后就可以测试二级缓存功能了。
在正式测试前,将spring.cache的ttl的配置先全部注释掉,以方便测试。
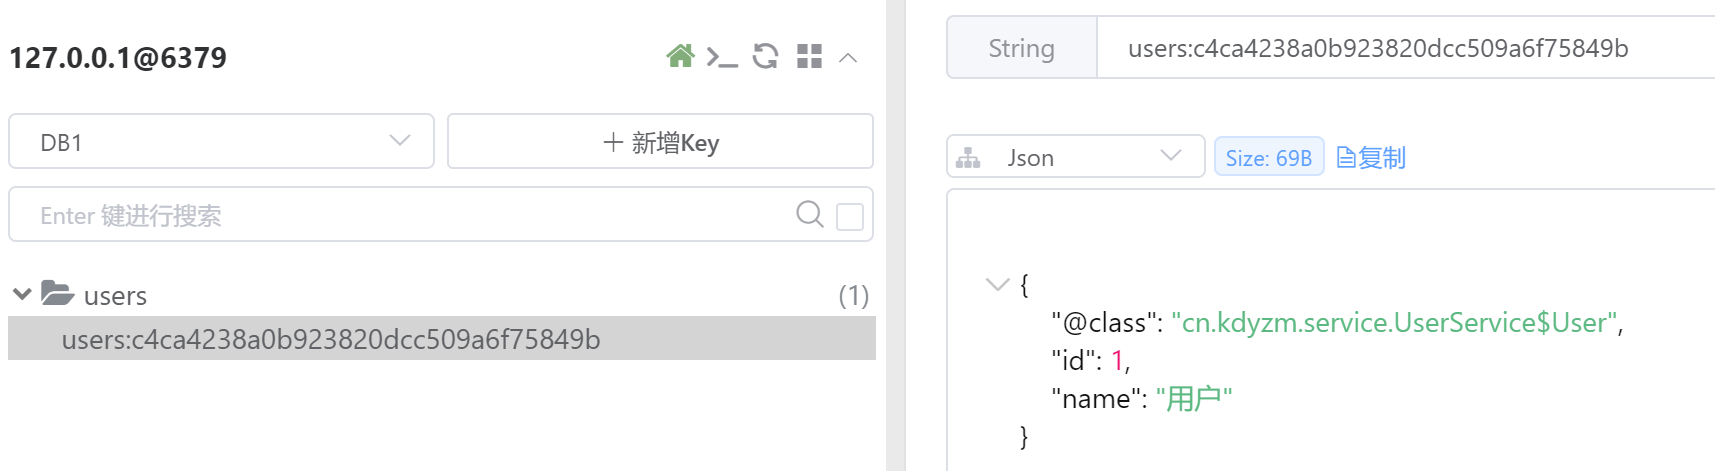
第一步:测试缓存保存功能
调用接口:http://localhost:8080/test/testGet ,观察日志输出

可以看到,由于没有缓存,所以会去查询数据库,之后再调用Cache的put方法将数据保存到一级缓存、二级缓存,同时触发Redis消息队列发消息,通知其它服务缓存变更,更新一级缓存(二级缓存已经由本服务更新)。
第二步:重复调用,测试缓存是否生效
再次调用接口:http://localhost:8080/test/testGet ,观察日志输出

可以看到,没有再查询数据库,直接从缓存中查询到了数据并返回了,缓存生效了。
第三步:验证二级缓存
前一步缓存已经生效了,如何验证它获取的是一级缓存的数据还是二级缓存的数据呢?当然可以debug代码,其实还有个更简单的方法,那就是重启服务。由于caffeine使用的是本地缓存,重启后将会失效,所以理论上来说重启后再次调用接口,服务不会从数据库获取,而是从redis一级缓存中获取数据。
重启服务后,重新请求接口:http://localhost:8080/test/testGet ,观察日志输出:

可以看到,并没有请求数据库。caffein从redis二级缓存中获取到了数据。
为了更直观的看到使用的是一级缓存,将redis中的数据删除:
删除后,重新请求 http://localhost:8080/test/testGet ,观察日志:

可以看到还是从缓存中获取了,观察redis,却没有新增key,说明当前缓存使用的是一级缓存caffeine。
四、技术细节
1、通过注解隔离三种缓存模式
通过三种注解
@EnableMultipleCache
@EnableCaffeineCache
@EnableRedisCache
开启三种不同的缓存模式,本质上是通过注解中的@Import功能激活相对应的Configuration:
@Target(ElementType.TYPE)
@Retention(RetentionPolicy.RUNTIME)
@Documented
@Import(MultipleCacheConfiguration.class)
public @interface EnableMultipleCache {
}
每个Configuration是相互隔离的,并不会同时生效。
2、多级缓存的实现
实际上核心就是自定义CacheManager以及自定义Cache,对应着代码中的 MultipleCacheManager 以及 MultipleCache 。
MultiCacheManager用于根据CacheName查询对应的MultipleCache对象,实际的缓存CRUD都通过MultipleCache对象实现。
MultipleCache类并没有直接实现Cach接口,而是通过继承AbstractValueAdaptingCache类实现,这是借鉴了CaffeineCache、RedisCache的实现,通过继承该抽象类,可以减小实现难度。
3、缓存一致性
缓存一致性需要分具体场景讨论。
场景一:分布式场景下,服务A有两个实例,实例1通过接口从数据库取出数据并添加到了缓存,所以实例1的一级缓存和二级缓存都有了,但是实例2只有二级Redis缓存,一级缓存缺失。
解决方式是通过Redis发布订阅模式,当实例1添加缓存之后,立即通过消息队列通知其它服务,其它服务得到消息后构建一级缓存。
相对于新增一级缓存,缓存的失效同步更加重要,消息一共有三种类型:缓存更新、缓存失效、缓存全部失效。具体可看类:MsgCacheActionType
场景二:Redis发布订阅失效,场景1中实例2没接收到更新的消息,对于新增的场景来说,一级缓存可以从二级缓存中取出数据保存到一级缓存达成缓存一致性;对于缓存失效的场景来说会出现一致性问题。
所以最佳实践是一级缓存一定要设置有效期,这样可以达到最终一致性。
场景三:一级缓存和二级缓存的有效期不同,导致两个缓存可能会各自独立存在一段时间,出现缓存一致性问题。
我们追求的是最终一致性,所以短暂的缓存不一致是可以接受的。二级缓存是多服务共享的,所以不必担心,一级缓存只要设置了有效期,其必定会和一级缓存同步。
在 RedisCacheSynMessageReceiver 类中实现了对一级缓存的同步。
END.
注意:本文归作者所有,未经作者允许,不得转载