在上一篇文章《Redis(十一):Java客户端之Jedis》中已经介绍了使用Jedis作为Redis客户端操作Redis的方法,实际上Redis的客户端有很多,Jedis只是其中之一,比较有名的还有Lettuce、Redisson,以及本篇文章将要介绍的Spring Data Redis。SpringBoot通过spring-boot-starter-data-redis模块提供了对Redis的完美支持,极大简化了Java开发者使用Redis的复杂度。本文将依次讲解如何在SpringBoot项目中集成盖组件,涵盖基础配置、数据操作、缓存实现等。
Spring Data Redis官方文档:https://docs.spring.io/spring-data/redis/reference/index.html
一、环境搭建
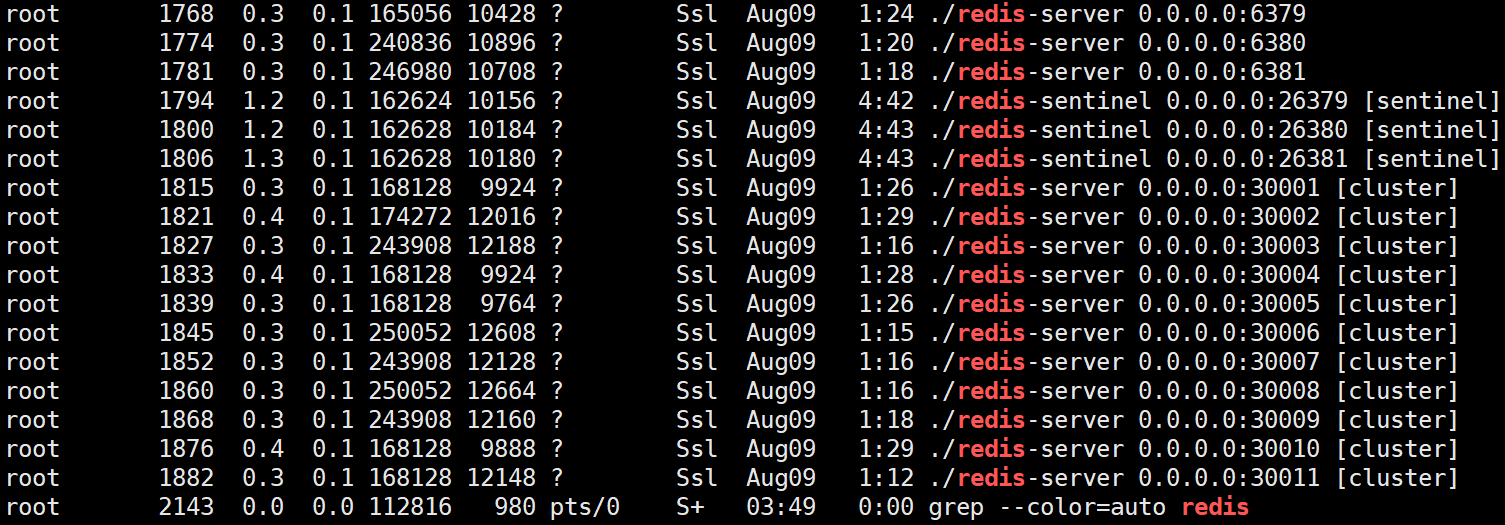
首先,我们需要redis环境,可以参考文章:《CentOS安装Redis》、《Redis(七):多机部署之主从复制模式》、《Redis(八):多机部署之Sentinel(哨兵)模式》、《Redis(九):多机部署之Cluster(集群)模式》四篇文章分别搭建好主从复制模式、哨兵模式、集群模式三种模式的redis服务,有人问为什么不搭建standalone模式的Redis服务,实际上主从复制模式就是,只是多了几个从节点而已。部署好之后可以通过ps -aux | grep redis命令查询:

spring-boot-starter-data-redis组件是springboot官方的组件,引入类似组件要注意版本号应当与springboot版本号保持一致。上一篇文章《Java8升级的一点思考》说过了java8已经过时了,要使用java21,接下来就基于java21+最新版SpringBoot3.5.4搭建开发环境。
首先创建maven项目,并引入如下pom文件:
<?xml version="1.0" encoding="UTF-8"?>
<project xmlns="http://maven.apache.org/POM/4.0.0"
         xmlns:xsi="http://www.w3.org/2001/XMLSchema-instance"
         xsi:schemaLocation="http://maven.apache.org/POM/4.0.0 http://maven.apache.org/xsd/maven-4.0.0.xsd">
    <modelVersion>4.0.0</modelVersion>

    <groupId>cn.kdyzm</groupId>
    <artifactId>spring-data-redis</artifactId>
    <version>1.0-SNAPSHOT</version>

    <properties>
        <maven.compiler.source>21</maven.compiler.source>
        <maven.compiler.target>21</maven.compiler.target>
        <project.build.sourceEncoding>UTF-8</project.build.sourceEncoding>
    </properties>

    <dependencyManagement>
        <dependencies>
            <dependency>
                <groupId>org.springframework.boot</groupId>
                <artifactId>spring-boot-dependencies</artifactId>
                <version>3.5.4</version>
                <type>pom</type>
                <scope>import</scope>
            </dependency>
        </dependencies>
    </dependencyManagement>
    <dependencies>
        <dependency>
            <groupId>org.springframework.boot</groupId>
            <artifactId>spring-boot-starter-data-redis</artifactId>
        </dependency>
        <dependency>
            <groupId>org.springframework.boot</groupId>
            <artifactId>spring-boot-starter-test</artifactId>
        </dependency>
        <dependency>
            <groupId>org.springframework.boot</groupId>
            <artifactId>spring-boot-configuration-processor</artifactId>
            <scope>annotationProcessor</scope>
        </dependency>
        <dependency>
            <groupId>org.projectlombok</groupId>
            <artifactId>lombok</artifactId>
            <scope>annotationProcessor</scope>
        </dependency>
    </dependencies>
</project>
然后启动类:
package cn.kdyzm;

import org.springframework.boot.SpringApplication;
import org.springframework.boot.autoconfigure.SpringBootApplication;

@SpringBootApplication
public class Application {

    public static void main(String[] args) {
        SpringApplication.run(Application.class, args);
    }
}
注意由于没有引入web组件,所以项目启动之后会退出,这是正常现象。
二、底层驱动
Spring Data Redis底层可以使用两种组件驱动连接Reids服务器:Jedis以及Lettuce,其中Lettuce是默认的组件,其依赖已经被自动引入,如果想替换成Jedis,则需要引入Jedis组件:
<dependency>
    <groupId>redis.clients</groupId>
    <artifactId>jedis</artifactId>
    <version>5.1.5</version>
</dependency>
Jedis和Lettuce支持的操作不一样,但是总体来说Lettuce无论是功能多样性还是性能上均比Jedis强:
| Supported Feature | Lettuce | Jedis |
|---|---|---|
| Standalone Connections | X | X |
| Master/Replica Connections | X | |
| Redis Sentinel | Master Lookup, Sentinel Authentication, Replica Reads | Master Lookup |
| Redis Cluster | Cluster Connections, Cluster Node Connections, Replica Reads | Cluster Connections, Cluster Node Connections |
| Transport Channels | TCP, OS-native TCP (epoll, kqueue), Unix Domain Sockets | TCP |
| Connection Pooling | X (using commons-pool2) |
X (using commons-pool2) |
| Other Connection Features | Singleton-connection sharing for non-blocking commands | Pipelining and Transactions mutually exclusive. Cannot use server/connection commands in pipeline/transactions. |
| SSL Support | X | X |
| Pub/Sub | X | X |
| Pipelining | X | X (Pipelining and Transactions mutually exclusive) |
| Transactions | X | X (Pipelining and Transactions mutually exclusive) |
| Datatype support | Key, String, List, Set, Sorted Set, Hash, Server, Stream, Scripting, Geo, HyperLogLog | Key, String, List, Set, Sorted Set, Hash, Server, Stream, Scripting, Geo, HyperLogLog |
| Reactive (non-blocking) API | X |
三、连接模式
众所周知,Redis有四种运行方式:独立运行模式、主从复制模式、哨兵模式、集群模式,在spring-boot-stater-data-redis中这四种模式的连接需要做不同的配置,具体可以参考官方文档:https://docs.spring.io/spring-data/redis/reference/redis/connection-modes.html
以下四种模式均可以通过配置文件配置RedisConnectionFactory信息,但是需要显示声明RedisTemplate Bean对象。
1、独立运行模式
独立运行模式只需要连接一个Redis实例就可以了,新建RedisConfiguration类,其内容如下所示:
import org.springframework.beans.factory.annotation.Configurable;
import org.springframework.context.annotation.Bean;
import org.springframework.data.redis.connection.RedisConnectionFactory;
import org.springframework.data.redis.connection.RedisStandaloneConfiguration;
import org.springframework.data.redis.connection.lettuce.LettuceConnectionFactory;
import org.springframework.data.redis.core.RedisTemplate;
import org.springframework.data.redis.serializer.StringRedisSerializer;

@Configurable
public class RedisConfiguration {

    public static final String HOST = "192.168.203.130";

    /**
     * Lettuce
     */
    @Bean
    public RedisConnectionFactory lettuceConnectionFactory() {
        return new LettuceConnectionFactory(new RedisStandaloneConfiguration(HOST, 6379));
    }

    @Bean
    public RedisTemplate<String, Object> redisTemplate(RedisConnectionFactory factory) {
        RedisTemplate<String, Object> template = new RedisTemplate<>();
        template.setConnectionFactory(factory);
        // 必须设置序列化器
        template.setKeySerializer(new StringRedisSerializer());
        template.setValueSerializer(new StringRedisSerializer());
        return template;
    }

//    /**
//     * Jedis
//     */
//    @Bean
//    public RedisConnectionFactory jedisConnectionFactory() {
//        return new JedisConnectionFactory(new RedisStandaloneConfiguration(HOST, 6379));
//    }
}
除了上述方法之外,还可以配置文件设置连接信息:
spring:
  data:
    redis:
      host: 192.168.203.130
      port: 6379
      database: 0
这样,只需要在代码里配置RedisTemplate信息就可以了,RedisConnectionFactory则会根据配置信息自动创建:
@Bean
public RedisTemplate<String, Object> redisTemplate(RedisConnectionFactory factory) {
    RedisTemplate<String, Object> template = new RedisTemplate<>();
    template.setConnectionFactory(factory);
    // 必须设置序列化器
    template.setKeySerializer(new StringRedisSerializer());
    template.setValueSerializer(new StringRedisSerializer());
    return template;
}
2、主从复制模式
主从复制模式的好处就是可以写主读从,但是没有哨兵加持的主从复制模式,无法实现自动故障转移。通过使用Lettuce相关功能,可以实现写主读从:
import io.lettuce.core.ReadFrom;
import org.springframework.context.annotation.Bean;
import org.springframework.context.annotation.Configuration;
import org.springframework.data.redis.connection.RedisStandaloneConfiguration;
import org.springframework.data.redis.connection.lettuce.LettuceClientConfiguration;
import org.springframework.data.redis.connection.lettuce.LettuceConnectionFactory;

@Configuration
public class WriteToMasterReadFromReplicaConfiguration {

    public static final String HOST = "192.168.203.130";

	@Bean
    public RedisTemplate<String, Object> redisTemplate(RedisConnectionFactory factory) {
        RedisTemplate<String, Object> template = new RedisTemplate<>();
        template.setConnectionFactory(factory);
        // 必须设置序列化器
        template.setKeySerializer(new StringRedisSerializer());
        template.setValueSerializer(new StringRedisSerializer());
        return template;
    }

    @Bean
    public LettuceConnectionFactory redisConnectionFactory() {
        LettuceClientConfiguration clientConfig = LettuceClientConfiguration.builder()
                .readFrom(ReadFrom.REPLICA_PREFERRED)//读操作优先考虑从节点,如果从节点不可用,从主节点读取
                .build();
        RedisStandaloneConfiguration serverConfig = new RedisStandaloneConfiguration(
                HOST, 6379
        );
        return new LettuceConnectionFactory(serverConfig, clientConfig);
    }
}
需要注意的是,不需要配置所有的节点,只需要配置主节点即可,从主节点可以自动发现其余从节点。代码中的readFrom方法只是设置了个读取的策略,并非用于设置从节点。
除了上述代码方法之外,还可以通过配置文件的方式配置RedisConnnectionFactory信息:
spring:
  data:
    redis:
      host: 192.168.203.130
      port: 6379
      database: 0
      lettuce:
        read-from: replica-preferred
3、哨兵模式
哨兵模式的配置非常简单,只需要提供master的名字以及所有哨兵节点的地址即可。
import org.springframework.context.annotation.Bean;
import org.springframework.context.annotation.Configuration;
import org.springframework.data.redis.connection.RedisConnectionFactory;
import org.springframework.data.redis.connection.RedisSentinelConfiguration;
import org.springframework.data.redis.connection.lettuce.LettuceConnectionFactory;

@Configuration
public class ReidsSentinelConfiguration1 {

    public static final String HOST = "192.168.203.130";

    @Bean
    public RedisTemplate<String, Object> redisTemplate(RedisConnectionFactory factory) {
        RedisTemplate<String, Object> template = new RedisTemplate<>();
        template.setConnectionFactory(factory);
        // 必须设置序列化器
        template.setKeySerializer(new StringRedisSerializer());
        template.setValueSerializer(new StringRedisSerializer());
        return template;
    }

    /**
     * Lettuce
     */
    @Bean
    public RedisConnectionFactory lettuceConnectionFactory() {
        RedisSentinelConfiguration sentinelConfig = new RedisSentinelConfiguration()
                .master("mymaster")
                .sentinel(HOST, 26379)
                .sentinel(HOST, 26380)
                .sentinel(HOST, 26381);
        return new LettuceConnectionFactory(sentinelConfig);
    }

//    /**
//     * Jedis
//     */
//    @Bean
//    public RedisConnectionFactory jedisConnectionFactory() {
//        RedisSentinelConfiguration sentinelConfig = new RedisSentinelConfiguration()
//                .master("mymaster")
//                .sentinel(HOST, 26379)
//                .sentinel(HOST, 26380)
//                .sentinel(HOST, 26381);
//        return new JedisConnectionFactory(sentinelConfig);
//    }
}
当然也可以通过配置方式定义RedisConnectionFactory信息:
spring:
  data:
    redis:
      database: 0
      lettuce:
        read-from: replica-preferred
      sentinel:
        master: mymaster
        nodes:
          - 192.168.203.130:26379
          - 192.168.203.130:26380
          - 192.168.203.130:26381
4、集群模式
import org.assertj.core.util.Lists;
import org.springframework.context.annotation.Bean;
import org.springframework.context.annotation.Configuration;
import org.springframework.data.redis.connection.RedisClusterConfiguration;
import org.springframework.data.redis.connection.RedisConnectionFactory;
import org.springframework.data.redis.connection.lettuce.LettuceConnectionFactory;
import org.springframework.data.redis.core.RedisTemplate;
import org.springframework.data.redis.serializer.StringRedisSerializer;

import java.util.List;

@Configuration
public class RedisClusterConfiguration1 {

    @Bean
    public RedisTemplate<String, Object> redisTemplate(RedisConnectionFactory factory) {
        RedisTemplate<String, Object> template = new RedisTemplate<>();
        template.setConnectionFactory(factory);
        // 必须设置序列化器
        template.setKeySerializer(new StringRedisSerializer());
        template.setValueSerializer(new StringRedisSerializer());
        return template;
    }

    @Bean
    public RedisConnectionFactory connectionFactory() {
        List<String> nodes = Lists.list(
                "192.168.203.130:30001",
                "192.168.203.130:30002",
                "192.168.203.130:30003",
                "192.168.203.130:30004",
                "192.168.203.130:30005",
                "192.168.203.130:30006",
                "192.168.203.130:30007",
                "192.168.203.130:30008",
                "192.168.203.130:30009",
                "192.168.203.130:30010",
                "192.168.203.130:30011"
        );
        return new LettuceConnectionFactory(
                new RedisClusterConfiguration(nodes));
    }

}
也可以通过配置文件方式定义RedisConnectionFactory信息:
spring:
  data:
    redis:
      lettuce:
        read-from: replica-preferred
      cluster:
        nodes:
          - 192.168.203.130:30001
          - 192.168.203.130:30002
          - 192.168.203.130:30003
          - 192.168.203.130:30004
          - 192.168.203.130:30005
          - 192.168.203.130:30006
          - 192.168.203.130:30007
          - 192.168.203.130:30008
          - 192.168.203.130:30009
          - 192.168.203.130:30010
          - 192.168.203.130:30011
注意集群配置不要和哨兵配置一起配置使用,如果一起配置使用,哨兵模式优先生效;另外集群模式配置中的数据库号设置实际上不会生效,因为集群模式只能使用db0。
四、使用RedisTemplate操作Redis
RedisTemplate是操作Reids最核心的类,操作Redis基本数据类型只需要记住这一个类就可以了。
1、配置RedisTemplate
从上面的案例中已经可以看得出RedisTemplate的配置方式了。如果在配置文件中配置了redis链接信息,比如如下单体Reids:
spring:
  data:
    redis:
      host: 192.168.203.130
      port: 6379
      database: 0
可以直接配置RedisTemplate实例Bean:
@Bean
public RedisTemplate<String, Object> redisTemplate(RedisConnectionFactory factory) {
    RedisTemplate<String, Object> template = new RedisTemplate<>();
    template.setConnectionFactory(factory);
    // 必须设置序列化器
    template.setKeySerializer(new StringRedisSerializer());
    template.setValueSerializer(new StringRedisSerializer());
    return template;
}
但是如果没有配置文件,需要完整的配置RedisConnectionFactory之后再配置RedisTemplaet:
import org.springframework.beans.factory.annotation.Configurable;
import org.springframework.context.annotation.Bean;
import org.springframework.data.redis.connection.RedisConnectionFactory;
import org.springframework.data.redis.connection.RedisStandaloneConfiguration;
import org.springframework.data.redis.connection.lettuce.LettuceConnectionFactory;
import org.springframework.data.redis.core.RedisTemplate;
import org.springframework.data.redis.serializer.StringRedisSerializer;

@Configurable
public class RedisConfiguration {

    public static final String HOST = "192.168.203.130";

    /**
     * Lettuce
     */
    @Bean
    public RedisConnectionFactory lettuceConnectionFactory() {
        return new LettuceConnectionFactory(new RedisStandaloneConfiguration(HOST, 6379));
    }

    @Bean
    public RedisTemplate<String, Object> redisTemplate(RedisConnectionFactory factory) {
        RedisTemplate<String, Object> template = new RedisTemplate<>();
        template.setConnectionFactory(factory);
        // 必须设置序列化器
        template.setKeySerializer(new StringRedisSerializer());
        template.setValueSerializer(new StringRedisSerializer());
        return template;
    }

//    /**
//     * Jedis
//     */
//    @Bean
//    public RedisConnectionFactory jedisConnectionFactory() {
//        return new JedisConnectionFactory(new RedisStandaloneConfiguration(HOST, 6379));
//    }
}
2、配置序列化方式
我们写入Redis的时候发生了一次序列化操作,如何把我们的输入序列化之后传给Redis?序列化操作涉及到了Key的序列化以及Value的序列化,比较简单的就是都实用StringRedisSerializer:
@Bean
public RedisTemplate<String, Object> redisTemplate(RedisConnectionFactory factory) {
    RedisTemplate<String, Object> template = new RedisTemplate<>();
    template.setConnectionFactory(factory);
    // 必须设置序列化器
    template.setKeySerializer(new StringRedisSerializer());
    template.setValueSerializer(new StringRedisSerializer());
    return template;
}
当然还可以使用自定义的序列化方式,比如存储的值类型是Json格式,可以使用Json序列化工具。
如果使用第三方组件fastjson,先引入依赖:
<dependency>
    <groupId>com.alibaba</groupId>
    <artifactId>fastjson</artifactId>
    <version>2.0.58</version>
</dependency>
使用GenericFastJsonRedisSerializer类作为value的序列化工具:
@Bean
public RedisTemplate<String, Object> redisTemplate(RedisConnectionFactory factory) {
    RedisTemplate<String, Object> template = new RedisTemplate<>();
    template.setConnectionFactory(factory);
    // 使用FastJson作为value的序列化工具
    GenericFastJsonRedisSerializer valueSerializer = new GenericFastJsonRedisSerializer();
    template.setKeySerializer(new StringRedisSerializer());
    template.setValueSerializer(valueSerializer);
    return template;
}
另外,对于Jackson,可以做如下配置:
@Bean
public RedisTemplate<String, Object> redisTemplate(RedisConnectionFactory factory) {
    RedisTemplate<String, Object> template = new RedisTemplate<>();
    template.setConnectionFactory(factory);
    ObjectMapper objectMapper = new ObjectMapper();
    objectMapper.setVisibility(PropertyAccessor.ALL, JsonAutoDetect.Visibility.ANY);
    objectMapper.activateDefaultTyping(
            LaissezFaireSubTypeValidator.instance,
            ObjectMapper.DefaultTyping.NON_FINAL,
            JsonTypeInfo.As.WRAPPER_ARRAY);
    objectMapper.disable(SerializationFeature.WRITE_DATES_AS_TIMESTAMPS);
    objectMapper.registerModule(new JavaTimeModule());
    Jackson2JsonRedisSerializer<Object> jackson2JsonRedisSerializer = new Jackson2JsonRedisSerializer<>(
            objectMapper,
            Object.class);
    template.setKeySerializer(new StringRedisSerializer());
    template.setValueSerializer(jackson2JsonRedisSerializer);
    return template;
}
3、使用RedisTemplate
首先看一个操作字符串的案例:
import lombok.extern.slf4j.Slf4j;
import org.junit.jupiter.api.Test;
import org.springframework.beans.factory.annotation.Autowired;
import org.springframework.boot.test.context.SpringBootTest;
import org.springframework.data.redis.connection.RedisClusterNode;
import org.springframework.data.redis.core.RedisTemplate;

import java.util.Collection;

@Slf4j
@SpringBootTest
public class RedisConnectionTest {

    @Autowired
    private RedisTemplate<String, Object> redisTemplate;

    @Test
    public void lettuceConnectionTest() {
        String result = (String) redisTemplate.opsForValue().get("lisi");
        log.info(result);
    }
}
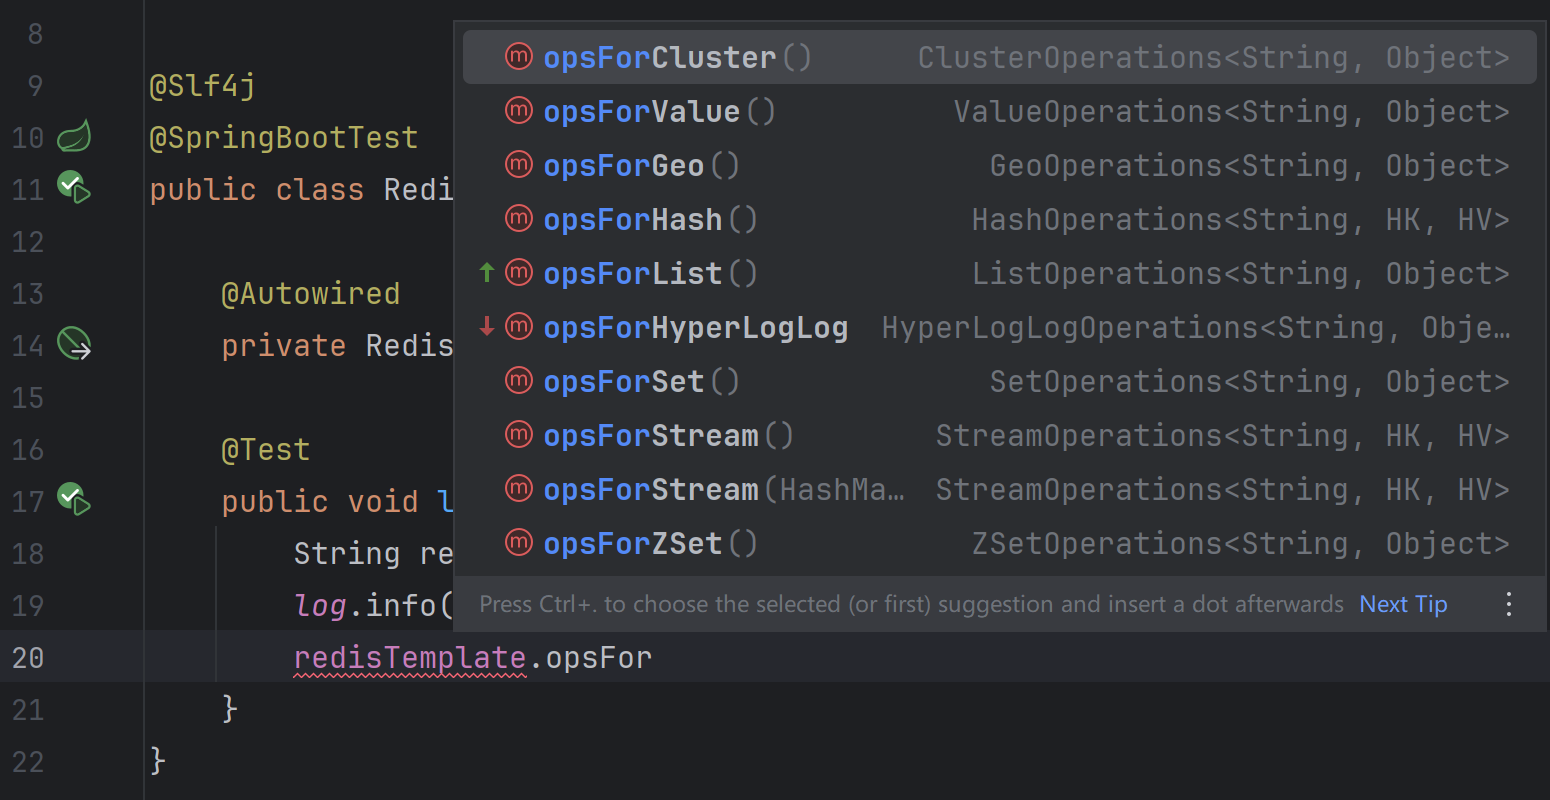
使用RedisTemplate操作某种数据类型,需要先调用opsFor[X]方法获取Operation实例:

其中操作方法和获取的Operation对象对应如下:
| 方法 | 返回值 | 作用 |
|---|---|---|
| redisTemplate.opsForValue() | ValueOperations |
字符串操作对象 |
| redisTemplate.opsForHash() | HashOperations |
hash操作对象 |
| redisTemplate.opsForList() | ListOperations |
list操作对象 |
| redisTemplate.opsForSet() | SetOperations |
set操作对象 |
| redisTemplate.opsForZSet() | ZSetOperations |
sorted set操作对象 |
| redisTemplate.opsForGeo() | GeoOperations |
geo操作对象 |
| redisTemplate.opsForHyperLogLog() | HyperLogLogOperations |
hyperloglog操作对象 |
| redisTemplate.opsForCluster() | ClusterOperations |
集群操作对象 |
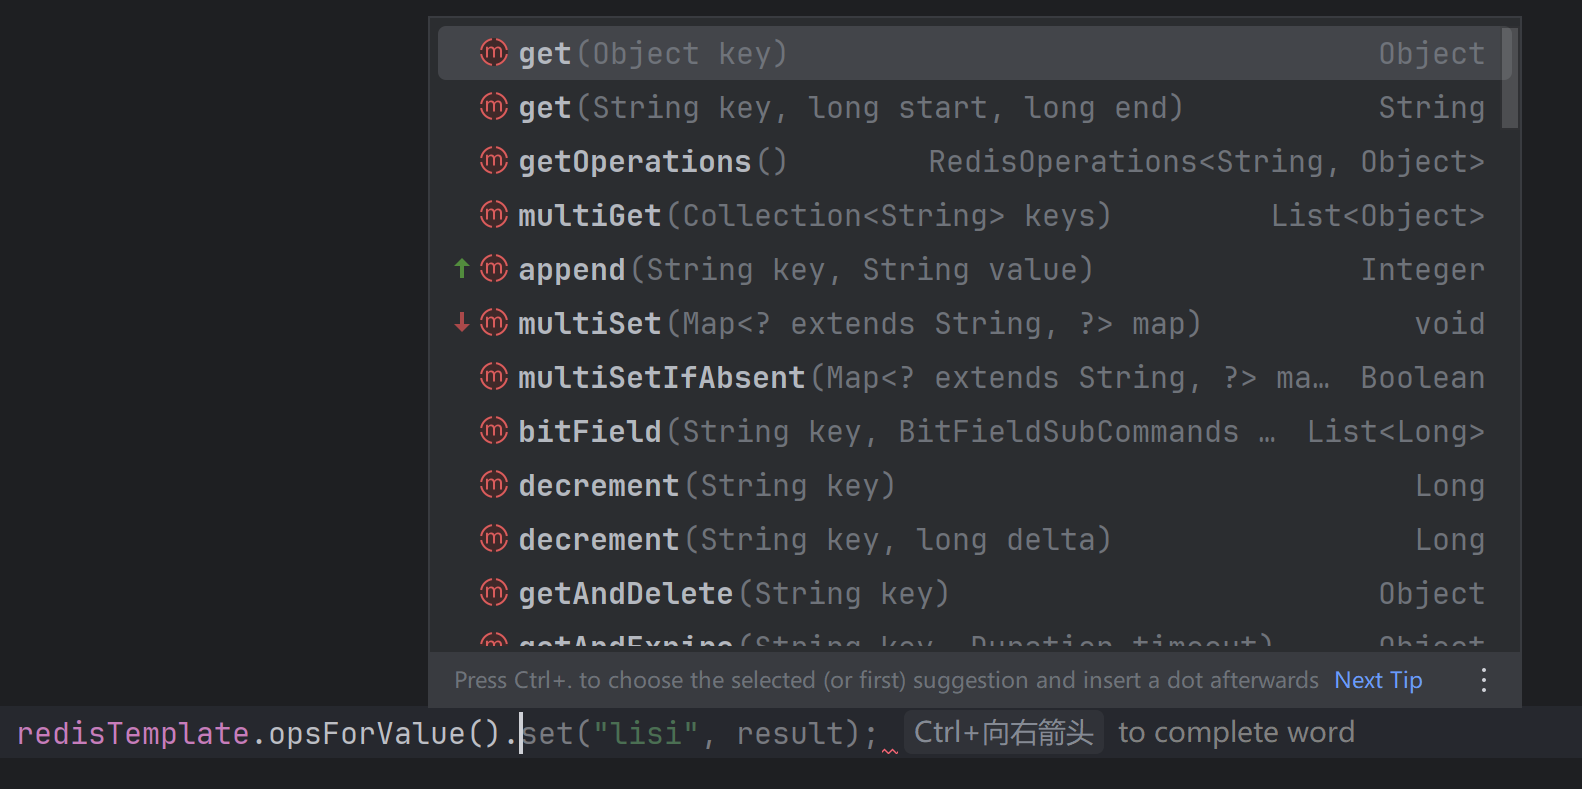
有些奇怪,为什么没有bitmap的操作对象?以为bitmap本身实际上是一个字符串,所以其操作合并到了ValueOperations中了:

另外,ClusterOperations 集成了一些集群管理命令,可以进行集群管理的一些操作,比如想查询某个节点的副本可以这样做:
Collection<RedisClusterNode> replicas = redisTemplate
        .opsForCluster()
        .getReplicas(new RedisClusterNode("192.168.203.130", 30001));
总之,拿到操作对象之后就可以操作Reids了,如果熟悉redis命令,则可以毫不费力的使用相关api:

更详细的api使用不再赘述。
五、消息发布/订阅
关于redis发布订阅的基本使用,可以参考我之前的文章:《Redis(二):Redis发布订阅模式》,接下来看看在Spring Data Redis中如何实现发布订阅模式。官方文档可参考:https://docs.spring.io/spring-data/redis/reference/redis/pubsub.html
1、消息发布
消息发布最简单的方式就是使用RedisTemplate:
@Test
public void publishMessageTest() {
    redisTemplate.convertAndSend("channel_kdyzm", "Hello,World");
}
也可以使用RedisConnection对象发送消息:
@Test
public void publishMessageByConnection(){
    RedisConnection connection = redisTemplate.getConnectionFactory().getConnection();
    connection.publish(
            "channel_kdyzm".getBytes(StandardCharsets.UTF_8),
            "Hello,World".getBytes(StandardCharsets.UTF_8)
    );
}
2、消息接收
消息的接收稍微有些复杂,首先,我们定义一个类MessageReceiver用于接收消息:
import lombok.AllArgsConstructor;
import lombok.extern.slf4j.Slf4j;

@Slf4j
@AllArgsConstructor
public class MessageReceiver {

    public void receive(String message) {
        log.info("receive message:{}", message);
    }
}
然后配置一些Bean:
import org.springframework.context.annotation.Bean;
import org.springframework.context.annotation.Configuration;
import org.springframework.data.redis.connection.RedisConnectionFactory;
import org.springframework.data.redis.listener.ChannelTopic;
import org.springframework.data.redis.listener.RedisMessageListenerContainer;
import org.springframework.data.redis.listener.adapter.MessageListenerAdapter;

@Configuration
public class PubSubConfig {

    /**
     * 创建自定义的接收消息的Bean
     */
    @Bean
    MessageReceiver listener() {
        return new MessageReceiver();
    }

    @Bean
    MessageListenerAdapter messageListenerAdapter(MessageReceiver listener) {
        //接收到消息的时候将会通过反射调用MessageReceiver对象的receive方法处理消息
        return new MessageListenerAdapter(listener, "receive");
    }

    @Bean
    RedisMessageListenerContainer redisMessageListenerContainer(RedisConnectionFactory connectionFactory, MessageListenerAdapter listener) {
        RedisMessageListenerContainer container = new RedisMessageListenerContainer();
        container.setConnectionFactory(connectionFactory);
        //监听channel_kdyzm channel
        container.addMessageListener(listener, ChannelTopic.of("channel_kdyzm"));
        return container;
    }
}
六、执行lua脚本
官方操作文档:https://docs.spring.io/spring-data/redis/reference/redis/scripting.html
比如我们有个lua脚本在resources资源目录下:
-- checkandset.lua
local current = redis.call('GET', KEYS[1])
if current == ARGV[1]
  then redis.call('SET', KEYS[1], ARGV[2])
  return true
end
return false
首先需要加载lua脚本:
@Bean
public RedisScript<Boolean> script() {
  ScriptSource scriptSource = new ResourceScriptSource(new ClassPathResource("META-INF/scripts/checkandset.lua"));
  return RedisScript.of(scriptSource, Boolean.class);
}
之后调用脚本:
public class Example {


  @Autowired
  private RedisTemplate<String, Object> redisTemplate;

  @Autowired
  RedisScript<Boolean> script;

  public boolean checkAndSet(String expectedValue, String newValue) {
    return redisTemplate.execute(script, List.of("key"), expectedValue, newValue);
  }
}
七、Reids Cache
Spring Data Reids组件除了提供了上述的直接操作Reids的功能外,还提供了封装好的缓存功能。官方文档地址:https://docs.spring.io/spring-data/redis/reference/redis/redis-cache.html
实际上SpringBoot要使用缓存功能,需要引入Spring Cache模块:
<dependency>
    <groupId>org.springframework.boot</groupId>
    <artifactId>spring-boot-starter-cache</artifactId>
</dependency>
但是我们已经引入了Spring Data Redis,就不需要再额外引入Spring Cache Starter了。
在成功集成了Spring Data Redis的情况下,只需要使用一个注解就可以开启缓存功能:@EnableCaching,开启缓存功能以后,会自动发现当前系统的缓存组件并启用。
@Cacheable
@Cacheable将方法的返回值缓存起来,后续相同参数的调用直接从缓存返回结果,避免重复执行方法体。该注解通常加到查询方法上,以减轻对数据库的查询压力。
该注解有两个非常重要的属性:
-
cacheNames:指定缓存存储的逻辑区域(即缓存组件的名称),类似于数据库中的“表名”或“命名空间”
-
key:定义缓存项在同一区域内的唯一标识(即缓存键),类似于数据库中的“主键”,一般需要Spel表达式定义改值。可以使用
#p0、#a0、#root.args[0]表示第一个参数。需要注意的是,也可以使用#参数名指定参数,但是在编译的时候一定要加上-parameters,否则这种方法将会因为找不到key的值而报错,查看文章《【转载】JDK8新特性:将参数名带到字节码文件》了解更多。
所以,在一个查询接口中,可以这么设置缓存:
@Cacheable(cacheNames = "users",key = "#p0")
public String getUser(String id){
    log.info("查询用户信息");
    return "zhangsan";
}
如上代码中调用该方法之后,会向redis中插入一个key:users::1

::是默认的分隔符。
我认为该注解缺少一个功能,那就是没有办法设置缓存有效期。
@CachePut
该注解用于强制更新缓存,每次调用都会执行方法体并将结果存入缓存。该注解通常加到更新或者新增的方法上:
@CachePut(value = "users", key = "#user.id")
public User updateUser(User user) {
    return userRepository.save(user);
}
@CacheEvict
该注解用于删除缓存,通常加到删除操作的方法上:
@CacheEvict(value = "users", key = "#id")  // 清除单条
public void deleteUser(Long id) {
    userRepository.deleteById(id);
}
八、其它
关于Redis的其它操作,Spring Data Redis还支持Streams、Transactions、Pipelining,由于用的比较少就不再介绍了,可以查看官方文档:
-
Streams:https://docs.spring.io/spring-data/redis/reference/redis/redis-streams.html
-
Transactions:https://docs.spring.io/spring-data/redis/reference/redis/transactions.html
-
Piplining:https://docs.spring.io/spring-data/redis/reference/redis/pipelining.html
END.
注意:本文归作者所有,未经作者允许,不得转载